Prop
Guard Installation Instructions
Time required: About 25-30 minutes. Don't be in a
hurry!
Prop
Guard Installation Instructions
Time required: About 25-30 minutes. Don't be in a
hurry!
Tools needed: Drill, 5/16" bit, 1/2" box end or socket wrench,
C-clamps or Grip clamps.
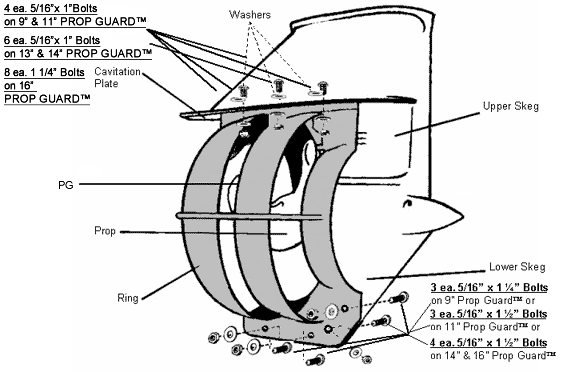
1. Place the Prop Guard® on the underside of the cavitation
plate. Align the guard so that equal distance exists between the
guard and the prop when the propeller revolves inside the guard.
The Prop
Guard® should be positioned as far forward on the cavitation
plate as possible. Note: The mounting surface of the guard should
remain flat against the cavitation plate. The use of a hand file
may be needed to remove any imperfections in the lower surface of
the cavitation plate and the lower skeg. REMOVE TRIM TAB UNDER CAVITATION BEFORE INSTALLATION OF PROP GUARD FOR 9", 11", 13" & 14" PROP GUARDS. MUST NOT EXCEED 35MPH AT THIS TIME.
2. Clamp the guard to the cavitation plate using C-clamps or Grip clamps. Insert bolts, washers and Nyloc nuts through bottom of pre-drilled holes at bottom of rings and loosely tighten.
3. Make certain that the guard is square with
the cavitation plate, propeller and lower skeg. PROPELLER MUST BE
SURROUNDED BY THE PROP GUARD®. MAY NEED TO SLIDE PROP GUARD FORWARD (PG) FORWARD OR AFT FOR PROPER PROP CLEARANCE.
4. Drill 2, 3 or 4 holes (see chart above) through the cavitation plate
and guard on each side. Insert bolts, washers and Nyloc nuts as
illustrated and loosely tighten.
5. Drill 1 to 2 holes (see chart above) through lower skeg, per
illustration. Insert bolt, washer and Nyloc nut, tighten
securely. Now tighten cavitation bolts. REMOVE CLAMPS
!!!
6. EXTREMELY IMPORTANT: MAKE SURE YOUR MOTOR IS
TRIMMED TO OBTAIN MAXIMUM PERFORMANCE OF YOUR PROP
GUARD®.

Images and content may
not be used for any purpose without written consent from Prop
Guard